A field report by Emily Hofstetter, Linköping University
[bg_collapse view=”button-red” color=”#ffffff” icon=”arrow” expand_text=”What’s a field report?” collapse_text=”Hide this explanation” ]Call for contributions
We welcome any stories of data collection or fieldwork that may be of interest to readers. Collecting data in a new or challenging context? Faced challenges in the field others should know about? Send us a brief report (up to 1000 words) for an upcoming publication.Please email your contribution to pubs@conversationanalysis.org
In this field report, I will explain my process for making a custom GoPro rig, in the hopes of encouraging others to try out making their own.
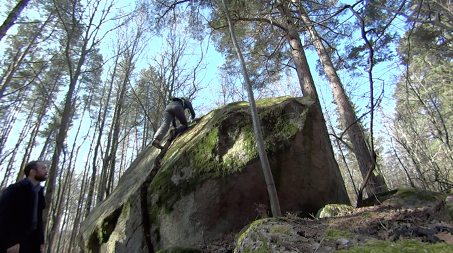
It is very difficult to get a camera perspective of what rock climbers see while they climb. Their bodies are held close to a rock face, turning any head-mounted or chest-mounted camera recording into a nauseatingly shaky view of wall at close quarters. Climbers’ bodies also obscure any perspective gained from behind. Worst of all, climbers are frequently twenty to sixty metres away, straight upwards. From that distance, a rock face blends into a solid mass, and the all-important grip spots for hands and feet are difficult to distinguish from neighbouring rock. On the bright side, this is a members’ problem, and climbers and their safety team are forced to communicate around these exact sensory barriers, which shows up in the recordings I can already make. However, there are still moments where insight into the conditions faced by the climber would illuminate analysis of climbing interaction. So, I began to investigate how to get a camera up with the climber. ((There are a lot of other solutions that might apply in different situations, but that did not apply to my own data collection. I mention them here in case it helps others brainstorm solutions for camera angles:
a) The camera could not go directly above the climber; in the gyms and at the outdoor crags I have been visiting, it is not possible to get above the climber for reasons of safety, time, or simply pure inaccessibility (a roof is in the way, or the cliff extends for miles upwards). An above-view does give unhindered access to some grip shapes, and often to the climber’s face or gaze orientation. Rigs to consider here may include attaching to a ceiling lamp, a long pole, or even hooking up to those non-damaging wall hooks (XX).
b) I could not get of equal height to the climber; this would require an extremely convenient ladder (which I could neither bring, nor existed naturally, in any space yet) or for me to be roped next to the climber on a neighbouring climb. However, then I would have to climb simultaneously, often a climb of a difficulty I could not accomplish even without trying to film. Plus, understandably, it is impolite to take up the space on any climb in case someone arrives who wishes to use it. Rigs to consider here include an actual ladder or a pulley system.
c) I have mentioned head-mount and chest-mount, and I recommend trying them to see if it helps. It is certainly common practice in the climbing community to post such views on the internet, however, those recordings fail to capture a great deal of relevant information for study interaction; those recordings are designed as a field guide to the climbing route and scenery, not to how the climber achieve climbing.))
To start, 360° cameras are one potential solution to all of this trouble, as well as a very good extension of the rig I suggest. McIlvenny (2018) has explored how to integrate 360° cameras, both as a fieldwork tool and with a custom-designed analytic software package that he and his team have developed. An important benefit of 360° cameras, besides generally recording an enormous field of view, is the ability to choose an angle of view later. Thus, a 360° camera on a head-mount would likely solve the ‘sea sick wall close-up’ problem I faced with a general wide-angle camera. McIlvenny (2016) has demonstrated the use of a ‘third-person perspective’ with a 360° camera, both as a hand-held and as a back-mounted option. It is this latter I would like to explore, although with GoPros since that is what I have available currently.
Third-person perspective is a common view in video games, where a character is seen from just over their shoulder, with the rest of the view being in front of that person (see Reeves et al. 2009 for a brief contrast with ‘first person shooter’, wherein one sees through the characters’ eyes). It is that view I am aiming to emulate, in order to view the texture of the rock face, and some view of the climbers’ hands. This has been done in various tutorials online((See 1) https://www.youtube.com/watch?v=hOdu1Zl1lic; 2) https://www.youtube.com/watch?v=8O5IfnFaNUs; 3) https://www.youtube.com/watch?v=t_RqUnDW9jc)), and GoPro((Such as their backpack with multiple mount positions: https://gopro.com/en/us/shop/accessories/seeker/AWOPB-002.html)) and other companies((Sail system: https://www.sailvideosystem.com/; GlideGear: https://glidegear.net/products/glide-gear-snc100-snorricam-dslr-vest-camera-3rd-person-harness)) have also started to produce professional versions to provide this view. The basic principle is to have some means of mounting a frame on a person’s back, and then mounting the camera on a pole that angles away and upwards, positioning the camera a little behind, and a little above the wearer’s shoulder. Besides cost, these versions did not work for climbing, as they were too large, too heavy, too uncomfortable, and too unsafe.
The version I have made is closer fitting, softer on the body, lighter, has fewer sharp or hard components, and can be secured against the risk of items falling off from great height. It is also enormously cheaper, though requiring some labour: besides the GoPro, tripod pole, and GoPro accessories I already owned, it cost approximately $15USD. I modified a second-hand small backpack to add mounts for the camera. The backpack has chest and hip straps to increase stability during the intense movement of climbing, while also being reasonably comfortable and unrestricting. It also provides an additional location on which to mount microphones.

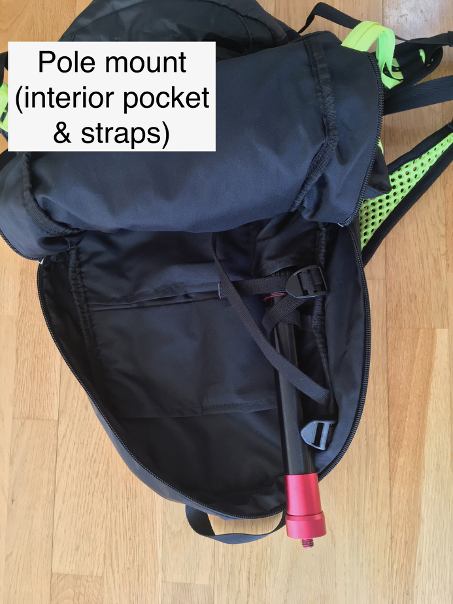
The pole mount
To make the third-person perspective, I sewed two adjustable straps into the backpack interior, which hold the camera pole in position. I also sewed the interior ‘pocket’ that happened to be in the backpack into a narrower slot, to reduce shifting further. The camera is then mounted to this height-adjustable pole. A further rig can be added to position the camera further behind the body, such as a jointed ‘monopod’((Such as this Joby GorillaPod monopod: https://joby.com/global/gorillapod-arm-kit-pro-jb01589-bww/)).
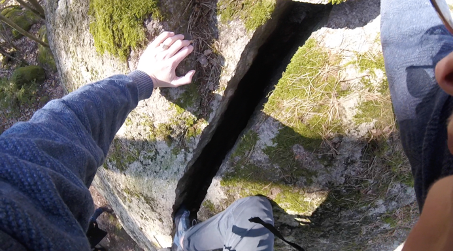
The pole mount gives a view from behind the head. Note that the pole view does not need to be in portrait orientation; we were experimenting with shots and did not get a comparable landscape shot in the field.
Back view
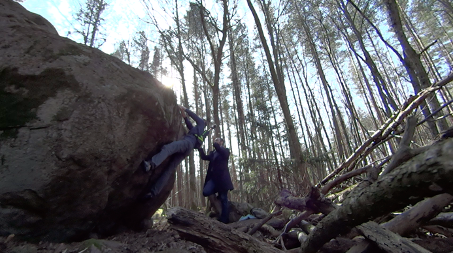
(One can see here some of the environmental interference common to climbing that makes ideal positioning of the ground camera difficult).
Pole view
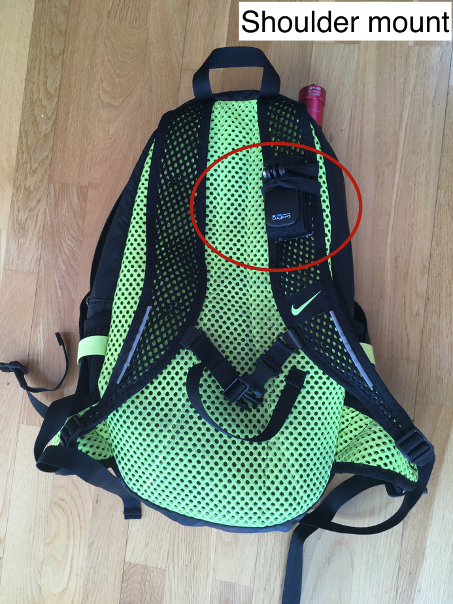
The shoulder mount
For climbing specifically, the pole can be too cumbersome, depending on the climb, both in that it is heavy, and in that it can get tangled in the ropes. Although it gives a better view of the head position and hands, I needed an alternative as a backup. Shoulder mounts give a reasonable view, that is still far enough back from the wall so as to see the hands, and even sometimes the gaze. Commercial shoulder mounts for backpacks are commonly available((There are tons of listicles available reviewing and comparing these, but here are two to start with. 1) Shoulder ’clips’ or holsters for cameras: https://www.bhphotovideo.com/explora/photography/hands-review/camera-holster-systems; 2) GoPro specific mounts: https://clicklikethis.com/gopro-backpack-mount/)), but I sewed this as well because it was cheaper and softer. A Velcro pad is sewn to the shoulder of the backpack. I sewed the reverse Velcro patch to the ‘baseball hat’ clip mount that comes in most standard GoPro kits, allowing the GoPro to be mounted to the Velcro patch.
Back view
Shoulder view
Notes on the test shots
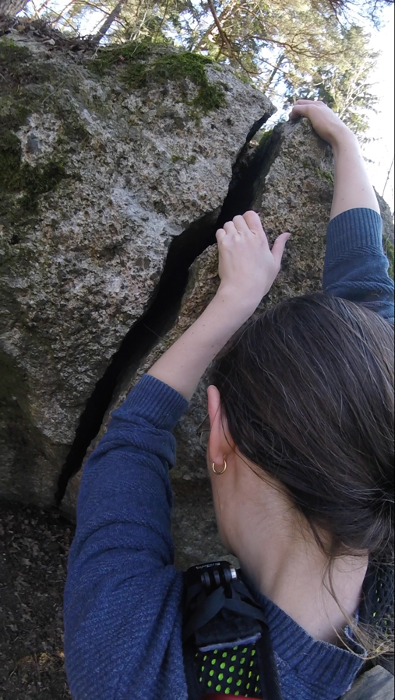
Due to the COVID-19 pandemic, we are yet to be able to test this with other climbers, or on a climbing wall higher than 10 feet or so. The bouldering images shown here would normally be captured with a ground camera, and additional angles could easily be gotten with handheld shots, since the climber stays close to the ground. However, once the climber gets above head height or ‘pole’ height, these backpack shots become the only good view of where the climbers’ hands, feet, and body are positioned, as well as the rock texture and grip affordances.
There is definitely interference from the head or face in many shots, however a chest mounted camera (as mentioned above) does not get a wide enough shot, so this compromise is the best available so far. An interesting additional, though perhaps odd, benefit is frequent views of the climber’s mouth, neck, and eyes, all of which provide insight into what muscles are being contracted or held tight.
Safety features
The pole-mount cannot be worn during bouldering, where climbers regularly fall completely to the ground onto padded mats. If they were to fall onto the pole, no matter how much padding, it would be uncomfortable. However, bouldering videos do not pose the kind of problems these rigs were designed to fix, as the camera can easily view the rock face from multiple angles from the ground.
When high off the ground, however, it is critical to ensure that the rig will not fall apart, as falling objects could hit the ground team. As a result, secondary securing loops have been sewn into the backpack, and attach to the pole, and camera, to prevent their falling in the event that they become detached from the backpack. This ‘double’ security is standard practice in climbing gear, so that if one element fails, the backup will prevent injury. Such backups are likely unnecessary in more typical, ground activities.
Summary
This project has accomplished several custom features necessary for a specific form of data collection. Climbing may be esoteric to some readers (although it is certainly an everyday kind of activity for climbers), but its specific needs raise the question of what adaptations may be worthwhile in other data collection activities. The rig I have created is not revolutionary by any means, but working with it has encouraged me to consider how my camera work can improve and create more useful recordings. Although we can wrestle standard tripods into position most of the time, are there other items in your fieldwork kit that could be more useful, add comfort, speed set up, or improve safety? As we collect more and more diverse data, we will need to draw on our ingenuity with crafting new rigs((There is no end of creative rig ideas available on the internet (including, humourously, this one, courtesy of Hannah Pelikan: https://www.youtube.com/watch?v=8A5cMcsYVHY). The Instagram account ’Shitty rigs’ is a wonderful collection of rig creativity: https://www.instagram.com/shittyrigs/?hl=en; Similarly, this compilation video of projects from ECAL Switzerland shows interesting extremes for capturing footage: https://vimeo.com/62869207.)). 3D printing is definitely one resource, but many more are possible. Although the first question in field setup may be ‘Is everyone/everything in shot?’, the next questions should be, ‘What am I missing?’ and ‘What else can I access?’
This is super interesting and quite revolutionary when it comes to data collection. I was wondering whether there are any systematized transcription conventions that can capture all this rich information.
This is great fun!!!! both making the GoPro rigs as well as the recordings of rock-climbing project. While we are stuck at home due to COVID-19, seeing the pictures of rock-climbing in a forest with blue sky, I exactly feel that the fresh air comes ourt from Emily’s text. This is so important for me, not just because of COVID-19, but also because it provides a life to the video-based research. I feel that those vivid reocrdings really capture the exciting part of life, the enegertic aspect of human and the situated enviroment. This project really provides an idea to… Read more »
This is great! Apart from its technical structure, which seems to be very efficient, this object is methodologically very interesting: as you mentioned, it gives access to the actual visual perspective of the participants.